Creating a New TrustZone Project
To create a new TrustZone project, in MPLAB® X IDE, Select File > New Project or click  . The New Project wizard will open. Perform following steps:
- Choose Project:
- In the Choose Project pane, select the Microchip Embedded category.
- In the Projects pane, select 32-bit MPLAB® Harmony 3 Project, then click Next.

Note: If the 32-Bit MPLAB® Harmony 3 Project type is not listed under the Microchip Embedded category, please download and install MPLAB® Harmony 3 Configurator before continuing with these steps.
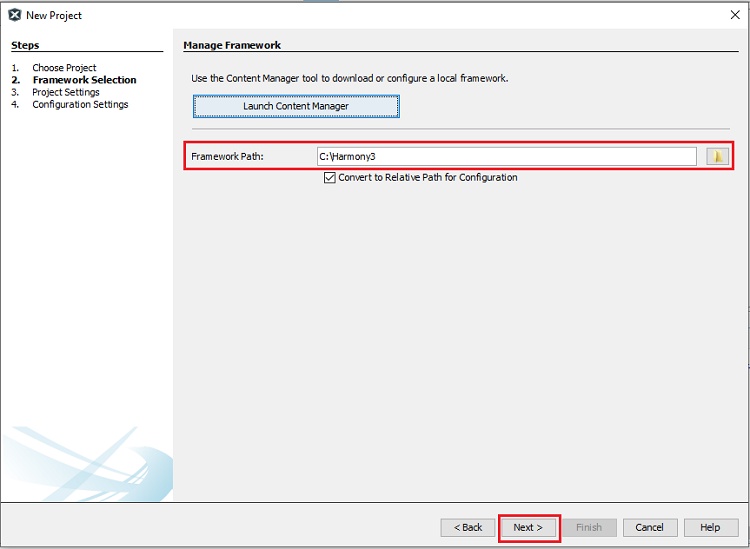
- Framework Selection:
-
Provide the framework path where Harmony 3 repositorries have been downloaded, then click Next.
-
- Project Settings:
- Location: Indicates the path to the root folder of the new project. All project files will be placed in this folder.
- Folder: Indicates the name of the MPLAB® X IDE folder.
- Name: Enter name of the project which you want to see in MPLAB® X IDE, click Next.
-
Path: The path information will be updated automatically as and when users make changes to other fields.
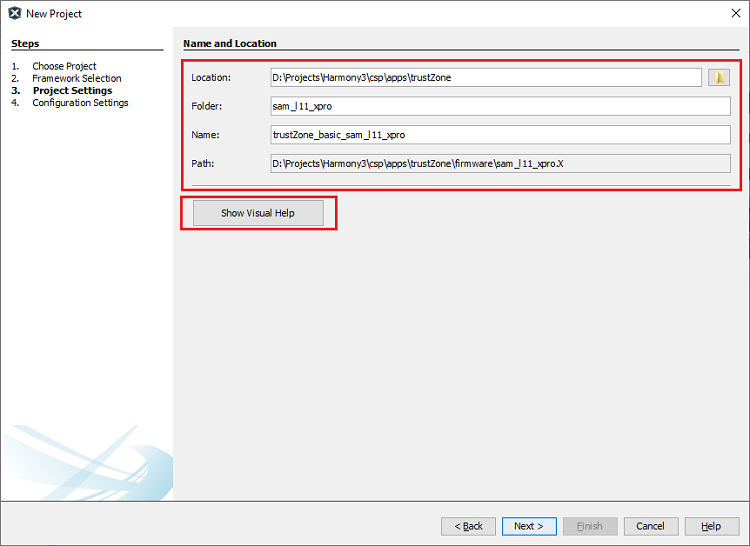
Note: Click the “Show Visual Help” button to open a contextual help window for a detailed description of various fields in the Project Settings.
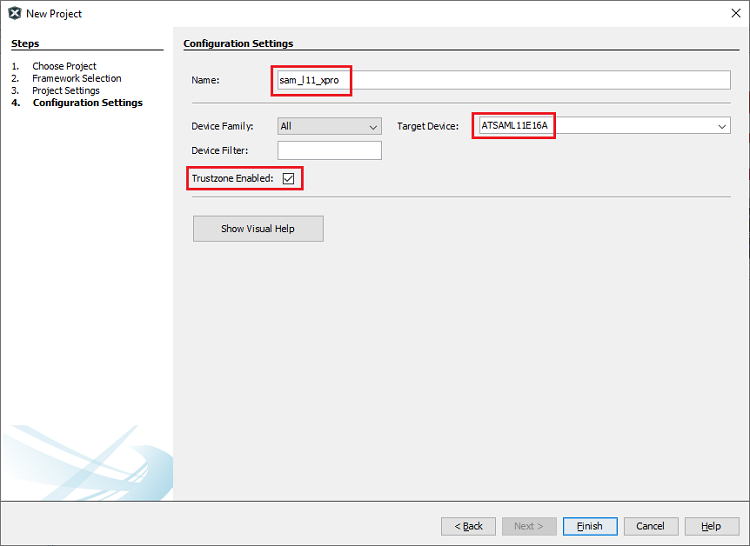
- Configuration Settings:
- Name: Enter the configuration name.
- Target Device: Choose target device
- TrustZone Enabled: Select checkbox and click Finish to launch MPLAB® Harmony Configurator (MHC). After clicking the Finish button, MHC will create Secure and Non-secure MPLAB® X Projects.
Note:
- After clicking the Finish button, if MHC does not launch, user can launch it by selecting Tools > Embedded > MPLAB® Harmony 3 Configurator from the MPLAB® X IDE.
The MHC plug-in will open either inside MPLAB® X window (native mode) or in a new window (standalone mode). This setting can be done in MPLAB® X > Tools > Options > Plugins > MPLAB® Harmony Configurator 3 > Window Manager.
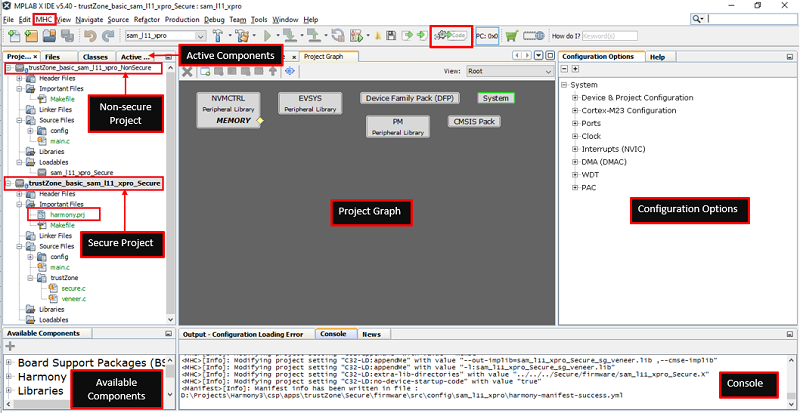
TrustZone Project uses two projects viz., Secure and Non-Secure Project that work together on the same MCU and offering security isolation between the Trusted and the Non-trusted resources in the device.
- Secure Project:
- Secure project contains harmony project file harmony.prj. And this project also contains a configuration file for both Secure and Non-secure project.
- Secure project must be selected as Main Project to launch MHC.
- Once the Harmony code is generated, Secure user application should be developed in secure “main.c”. And “veneer.c” and “veneer.h” files should be used for the Non-secure to Secure function calls and vice versa.
- Secure project is a loadable project from the Non-secure project. When Secure Project builds it generates Secure Gateway (SG) library ([configuration name]_Secure_sg_veneer.lib) which will be used by the Non-secure project while building the Non-secure project.
- Non-secure Project:
- Once the Harmony code is generated, Non-secure user application should be developed in Non-secure “main.c”.
- When Non-secure Project builds, it first builds Secure Project and then Non-secure project and generates target binaries to be executed on the device.
Runing TrustZone Project
Following steps need to be done to run TrustZone project:
-
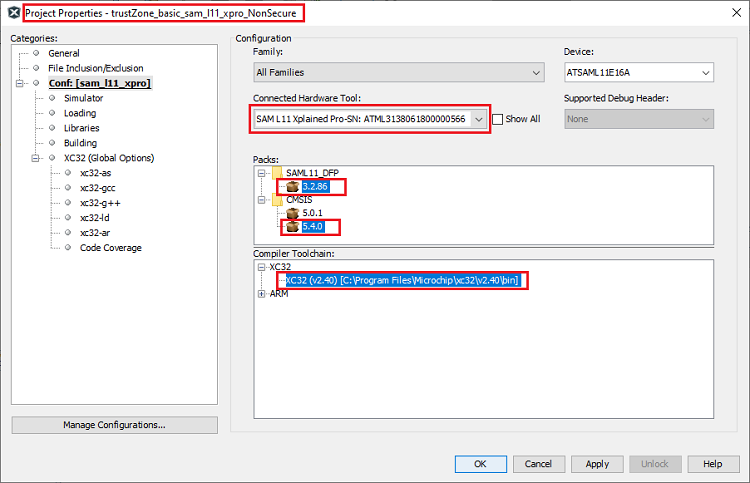
In MPLAB® X Non-secure Project properties, appropriate compiler, hardware tools and DFP should be selected as shown in the figure below.
-
Select Non-secure Project as Main Project, Non-secure Project can be then build and programmed using MPLAB® X “Make and Program Device Main Project” option.
Note
This page has been verified with the following versions of software tools:
- MPLAB Harmony v3 “csp” repo v3.7.1
- MPLAB Harmony v3 “dev_packs” repo v3.7.0
- MPLAB Harmony v3 “mhc” repo v3.4.0
- MPLAB Harmony Configurator Plugin v3.5.0
- MPLAB X IDE v5.40
- MPLAB XC32 Compiler v2.41
Because Microchip regularly update tools, occasionally there could be minor differences with the newer versions of the tools.